Last week we discussed the 2 most common mobility issues that affect squat performance: ankle mobility and hip mobility. Today, we will take a more in-depth look at limited ankle mobility and how you can address it to get you squatting with greater ease, less pain and improved mechanics.
Below is our checklist for proper squatting technique:
- Thighs parallel to the ground or below
- Knees should remain in line with the ankles
- Toes should remain pointing straight ahead
- Trunk should stay parallel to your shins
In the video below, you can see that Bri is unable to get low in the squat (thighs below parallel to ground) and her right foot turns outward. This is what cues us to further break down her movement and assess ankle mobility.
Step 1: Check Squat Performance
Step 2: Assess Ankle Mobility with Loaded Dorsiflexion Test
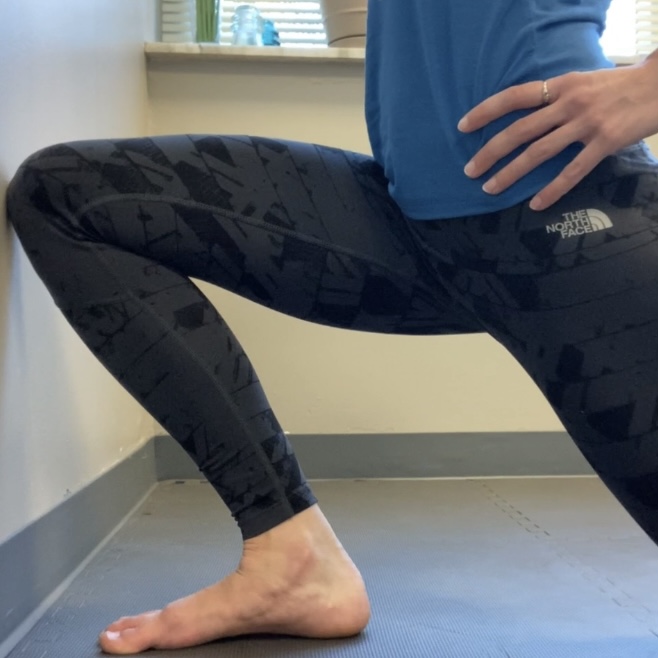
- Loaded Ankle Dorsiflexion Test:
- Position: Half kneeling position with toes 1 hand width away from the wall
- Test: drive knee forward as far as you can while keeping heel on the ground.
- Passing Criteria: knee hits wall, heel stays flat, no foot rotation.
Step 3: Perform Self Dorsiflexion Mobilization
- Half kneel position with affected ankle in front
- Heavy resistance band around front of affected ankle and back of knee on the hind leg .
- Lunge forward and back against the resistance of the ankle band
- Be sure to drive knee directly over toes and keep the heel on the ground
- Repeat 20-30 times.
* Another option to help restore ankle mobility is to address the mobility of the muscles in the calf (gastroc and soleus). You can do this by foam rolling the calf muscles or by using a tennis ball or lacrosse ball to perform a more localized release of the tissue.
Step 4: Re-Check Ankle mobility with Loaded Dorsiflexion Test
- In the video, her knee is now able to hit the wall (mobility has been restored).
Step 5: Re-check Squat Form
- She is now able to get thighs below parallel and without the right foot rotating outwards.
Now that ankle mobility and squat performance have improved, it is important to ensure carry-over.
Step 6: Use it
- In order to promote carry-over and maintenance of ankle mobility, you want to use it, particularly in a functional way. Using that mobility by squatting (with proper form) is a great way to do this!
Step 7: Load it
- Load the squat: by using resistance (kettlebell, dumbbell, etc) you will further promote carry-over of the gains you have made and will also help to build strength.
** It is important to ensure that when you start increasing load, your form does not suffer. Make sure that you are doing a load that challenges you, but not such a heavy load that you compromise your form or put yourself at risk of injury.
- Load the ankle: we can also simplify the movement to target just the ankle by performing loaded eccentric calf raises. Performing calf raises off the edge of a step (with heels declined) will promote use of full ankle range of motion and mobility to help maintain what was gained by doing the self ankle mobilizations and soft tissue release.
If you are still having difficulty with squatting, whether due to pain or poor form, there may be other factors limiting you. This may be a mobility issue elsewhere (the hip, knee, etc), limited strength or just difficulty with motor control.
Next week we will discuss how to fix your squat by addressing hip mobility.