Over the past two weeks, we’ve talked about assessing your limited squat mobility and how to address it if the limitation is coming from your ankle. This week we are going to take a deeper look into hip mobility limitations and how to improve hip mobility.
Below is a review of our checklist for proper squatting technique:
- Thighs parallel to the ground or below
- Knees should remain in line with the ankles
- Toes should remain pointing straight ahead
- Trunk should stay parallel to your shin.
Note: As we talk about proper squat technique, keep in mind that this is for assessing your squat only. When people perform squats functionally (especially as they add weight), they may find it more comfortable to point the toes out a bit or have the feet wider apart, for example. Everyone has a different shape to their hip joint. We just want to make sure that your adjustments aren’t a compensation for a mobility issue.
In the video below, Bri discusses limited squat mechanics and normal squat mechanics.
If the squat is limited, we then assess ankle mobility (as discussed last week) and hip mobility. Here are the steps to assess and address hip mobility:
Step 1: Check Squat Performance
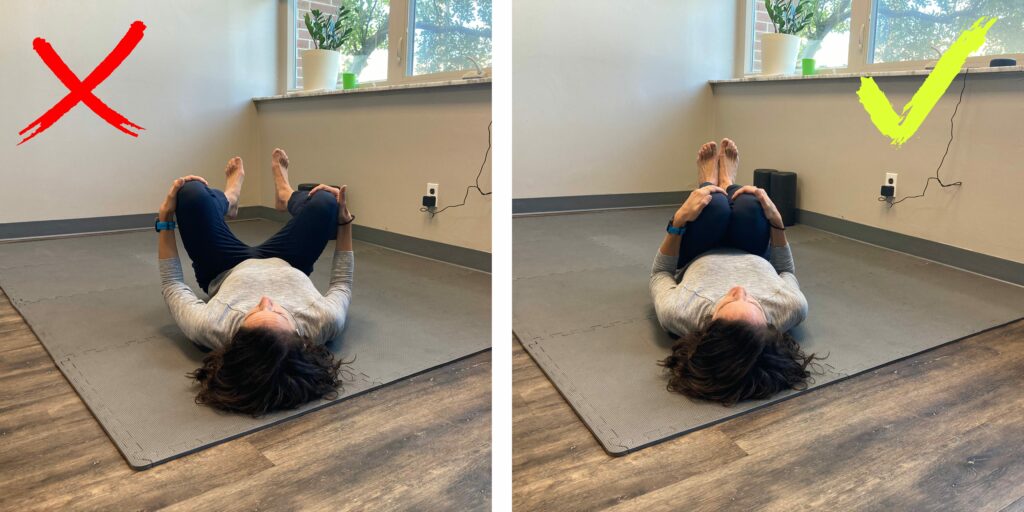
Step 2: Assess Hip Mobility (see the video below)
- Lie on your back and pull your knees to your chest.
- The knees should stay within hip-width. Some may find that their knees/legs open up as they pull closer to the chest. This is a failed test.
Step 3: Perform Self Hip Mobilization
- Improving hip mobility very much depends on how your hip is limited. We may prescribe a variety of hip joint mobilizations or stretches depending on your specific issue. Below we show how to perform joint mobilizations for the two most common mobility limitations of the hip.
Step 4: Re-Check Hip Mobility
Step 5: Re-Check Squat Form
Step 6: Use It
- In order to maintain mobility, you’ll want to use the mobility in a functional way. Using the mobility by performing squats with your new and improved form is a great way to do that. You can also begin to play with improving hip or back mobility in other ways while you’re in your squat. Examples of this are shown in the video below.
Step 7: Load It
- Load the Squat – Start to load the squat by adding weight (kettlebell, dumbbell, etc). When we are strong in a position, we feel safe in that position and can maintain that position. It is important though, as you add weight, that you do not lose your form.
- Load the Hip – Target specific muscles of the hip with exercises such as the one demonstrated below.
So now you have it! All the information you need to perform a healthy squat. For some, this might be all they need. For others, you may require some more individual assessment. Fixing your squat is definitely worth it. If you’re into lifting, this can be the key to healthier shoulders (improved form means less stress on the shoulders for overhead lifts) or lifting more weight. If you’re a runner, a poor squat can show us that you have limited ankle mobility, which is crucial for good performance and decreasing injury risk.
If you have any questions about your squat, set up a discovery visit with us and we’ll take a look!